


Python自动化实战:wxauto + AI大模型,打造你的私人微信助理
本文最后更新于 2026-04-22,文章内容可能已经过时。
想给微信装个AI机器人,却被复杂的API配置和封号风险劝退?其实,自动化并没有那么难!本文介绍的 wxauto 库,通过模拟人工操作的方式,无需深厚的编程功底,也能轻松实现微信自动回复。无论你是Python新手还是自动化爱好者,跟着本文的步骤,5分钟就能让你的微信变身智能小秘书。
一、前期准备
1.安装python
本地安装python配置环境变量:
这里我们参考他人文章安装,方法都一样:Python安装与环境配置全程详细教学(包含Windows版和Mac版)_windows python环境配置-CSDN博客
2.安装wxauto库
win + R打开CMD,输入以下代码进行安装:
pip install request wxauto二、了解wxauto库
wxauto 是一个基于 Windows GUI 自动化 的 Python 库。它通过 win32gui 查找微信主窗口(类名:WeChatMainWndForPC,标题:微信)。然后模拟鼠标点击、键盘输入,并通过 读取标准 Win32 控件(如 RichEdit、ListBox) 来获取消息内容。
学习参考:https://github.com/cluic/wxauto 项目介绍 | wxauto
展示一些wxauto基本用法示例:
# 基本用法
wx = WeChat()   # 获取微信对象

# 1.发送简单文字消息
wx.SendMsg("Hello World","人名")  # 指定发送对象

# 3.发送文件消息
wx.SendFiles(file_name,"name")   # 发送文件给指定的用户

# 2.获取会话列表
wx.GetSessionList()

# 3.获取当前会话的所有消息
wx.GetAllMessage()

# 4.指定消息类型
 msg.type == 'friend':    # 为指定类型时,则发送消息。
三、获取AI大模型API
推荐模型API平台:
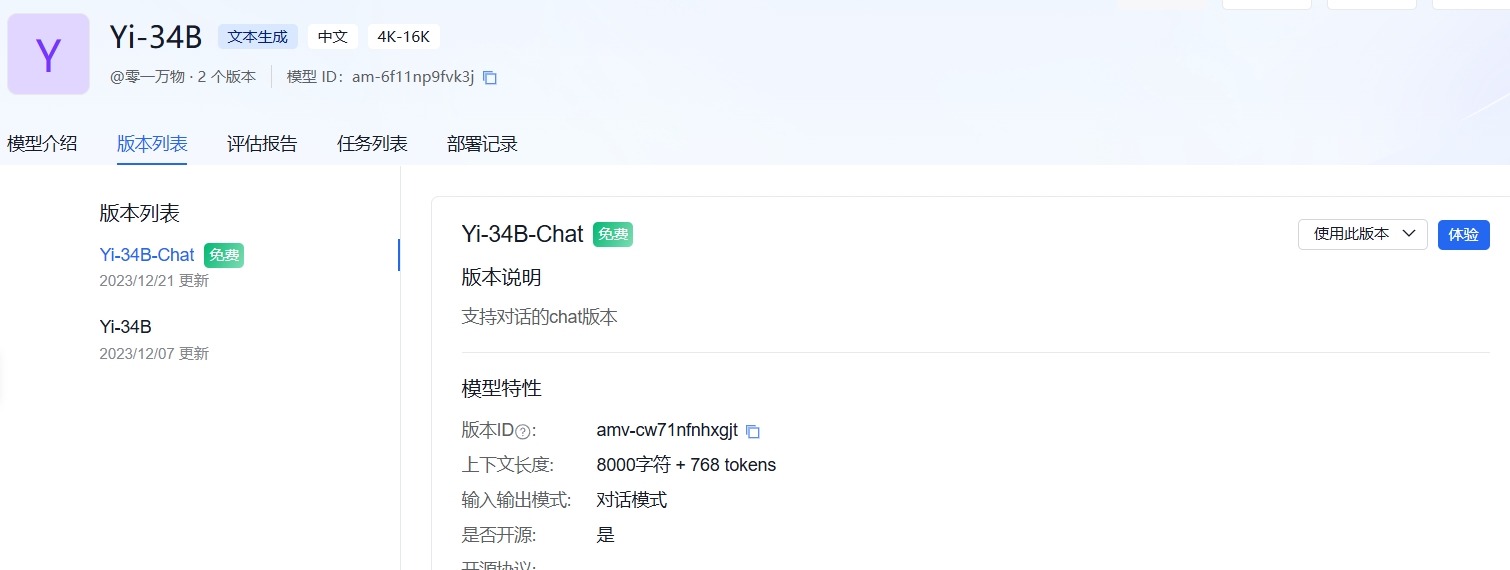
1.进入千帆大模型
1.注册登录账户:千帆大模型平台-百度智能云千帆
2.进入模型广场:选择免费 -> 文本生成模型 -> API文档参考,我们选择这个免费的模型。
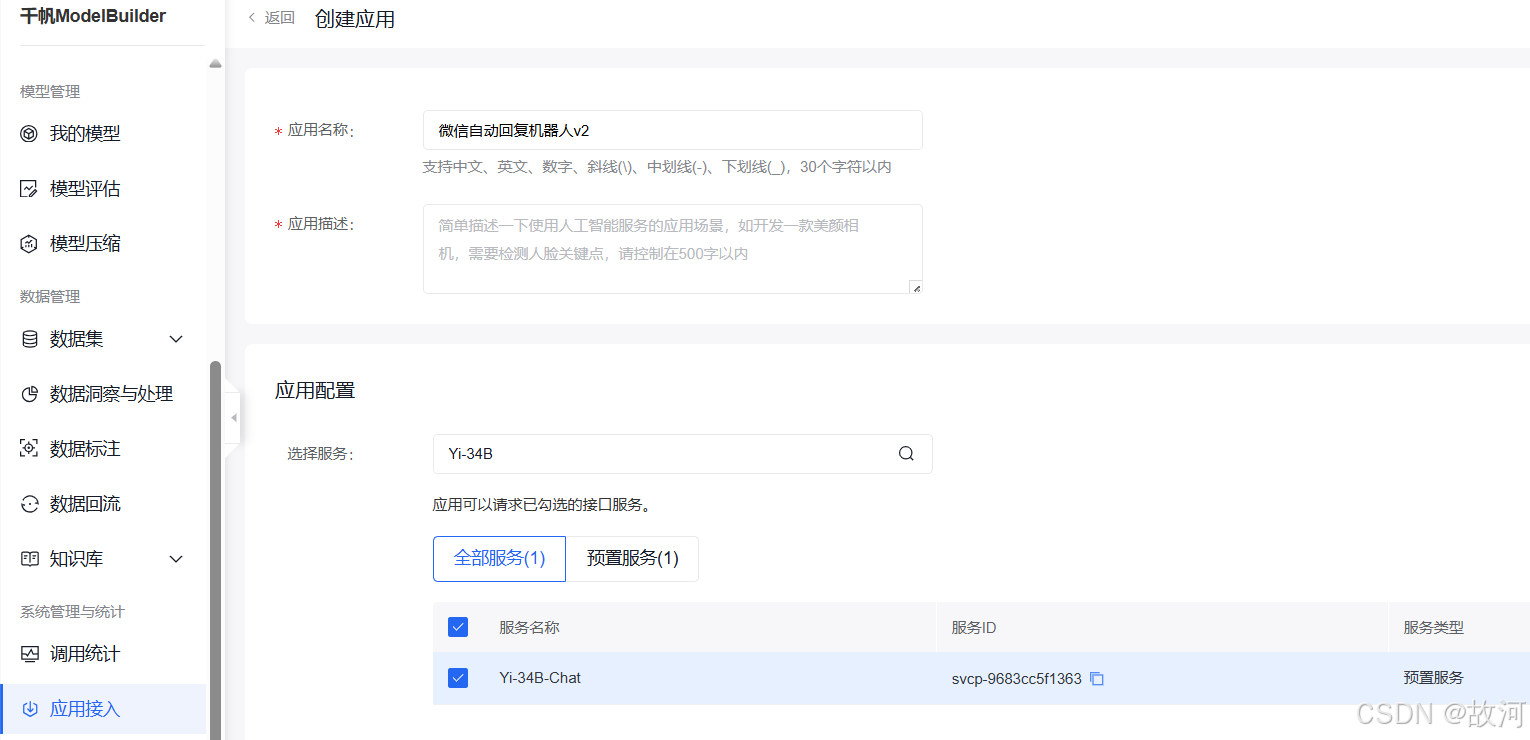
3.创建应用获取API密钥
1.创建应用
点击左侧的应用接入,然后创建应用,搜索刚刚寻找的模型名称,确定以创建。
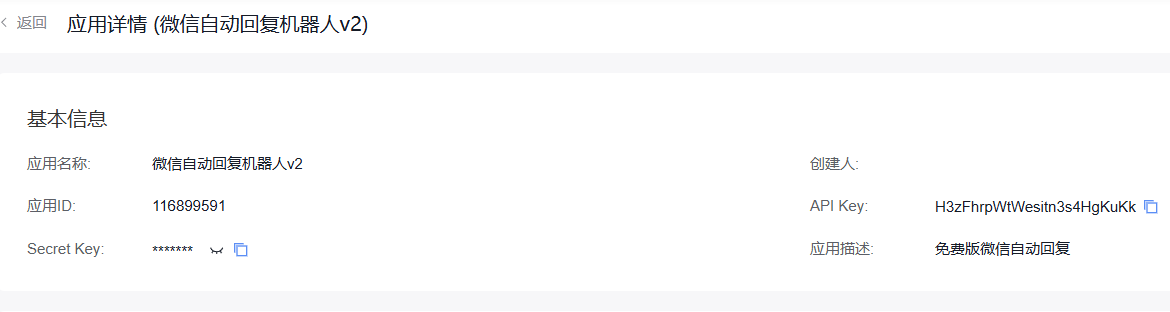
2.获取API密钥:
点击刚刚创建好的应用,获对应API Key,如图:
四、编写自动化程序并测试
1.调用方法
根据对应的AI模型如Yi-34B的API文档,获取API调用方法:
import requests
import json

def get_access_token():
    """
    使用 API Key,Secret Key 获取access_token,替换下列示例中的应用API Key、应用Secret Key
    """

    url = "https://aip.baidubce.com/oauth/2.0/token?grant_type=client_credentials&client_id=[应用API Key]&client_secret=[应用Secret Key]"

    payload = json.dumps("")
    headers = {
        'Content-Type': 'application/json',
        'Accept': 'application/json'
    }

    response = requests.request("POST", url, headers=headers, data=payload)
    return response.json().get("access_token")


def main():

    url = "https://aip.baidubce.com/rpc/2.0/ai_custom/v1/wenxinworkshop/chat/yi_34b_chat?access_token=" + get_access_token()

    payload = json.dumps({
         "messages": [
            {
                "role": "user",
                "content": "你好!"
            }
        ]
    })
    headers = {
        'Content-Type': 'application/json'
    }

    response = requests.request("POST", url, headers=headers, data=payload)

    print(response.text)


if __name__ == '__main__':
    main()
2.编写代码实现AI自动回复
代码1:监听单个朋友的消息,进行自动回复(用于单个消息回复):
import requests
import json
from wxauto import WeChat

'''
测试AI自动回复微信消息
'''

# 调用AI模型API
def get_access_token():
    """
    使用 API Key,Secret Key 获取access_token,替换下列示例中的应用API Key、应用Secret Key
    """

    url = "https://aip.baidubce.com/oauth/2.0/token?grant_type=client_credentials&client_id=H3zFhrpWtWesitn3s4HgKuKk&client_secret=Zf39d1i6lysBnZQ5MvdD967MmmM7nyUg"

    payload = json.dumps("")
    headers = {
        'Content-Type': 'application/json',
        'Accept': 'application/json'
    }

    response = requests.request("POST", url, headers=headers, data=payload)
    return response.json().get("access_token")


def main(wx, msg1):
    url = "https://aip.baidubce.com/rpc/2.0/ai_custom/v1/wenxinworkshop/chat/yi_34b_chat?access_token=" + get_access_token()

    payload = json.dumps({
        "messages": [
            {
                "role": "user",
                "content": msg1
            }
        ]
    })
    headers = {
        'Content-Type': 'application/json'
    }

    response = requests.request("POST", url, headers=headers, data=payload)
    json_result = json.loads(response.text)
    print(json_result)
    print(response.text)

    # 发送消息
    wx.SendMsg(msg=json_result['result'], who="00000110")   # who: 朋友昵称


if __name__ == '__main__':
    wx = WeChat()
    while True:
        msgs = wx.GetAllMessage()
        if msgs:
            if msgs[-1].type == "friend":
                main(wx, msgs[-1].content)
代码2:鼠标点击进入消息窗口,获取人名,进行AI自动回复(用于多个消息回复):
# 微信聊天机器人

from wxauto import *
import requests
import json
import time


# 官网API调用方法
def get_access_token():
    """
    使用 API Key,Secret Key 获取access_token,替换下列示例中的应用API Key、应用Secret Key
    """
    url = "https://aip.baidubce.com/oauth/2.0/token?grant_type=client_credentials&client_id=[应用API key]&client_secret=[应用Secret key]"
    headers = {
        'Content-Type': 'application/json',
        'Accept': 'application/json'
    }
    response = requests.post(url, headers=headers)
    return response.json().get("access_token")

# AI处理主函数
def main(wxs, msgs, whos):
    url = "https://aip.baidubce.com/rpc/2.0/ai_custom/v1/wenxinworkshop/chat/yi_34b_chat?access_token=" + get_access_token()
    payload = json.dumps({
        "messages": [
            {
                "role": "user",
                "content": msgs
            }
        ]
    })
    headers = {
        'Content-Type': 'application/json'
    }
    try:
        response = requests.post(url, headers=headers, data=payload)
        ai_response = response.json().get("result", "")
        print(response.text)
        wxs.SendMsg(ai_response, whos)
    except Exception as e:
        print(f"Error occurred: {e}")

# 程序按钮
def running():
    wx = WeChat()
    while True:
        msgs = wx.GetAllMessage()
        if msgs:
            last_msg = msgs[-1]
            #print(last_msg.__dict__)  # 打印消息对象的所有属性,用于调试
            if last_msg.type == "friend":  # 假设消息类型为 "friend"

                # 通过鼠标点击,获取发送者名称
                whos = last_msg.sender  # 使用 sender 属性
                main(wx, last_msg.content, whos)
        time.sleep(1)  # 避免频繁轮询


if __name__ == '__main__':
    # 运行程序
    running()
备注:该代码仅在 微信 Windows 版 3.7.0 ~ 3.8.8 范围内能稳定运行,不支持微信 3.9.0 及以上版本(包括你当前的 4.1.6.46)。
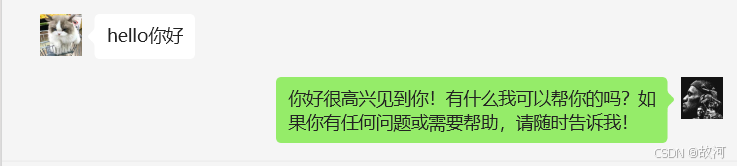
3.测试自动回复
这里我用自己的微信大号和小号进行测试:
希望这篇博客对你有帮助!如果有其他问题,欢迎随时提问!